Note: This is the last part of a three part series. The first part is here, and the previous part is here.
04- Compute
🗹 Right-size your resources/services and utilize auto-scaling whenever available:
These two basic topics are strongly coupled and form the basic architectural principle for cloud, so I won’t include an explanation for them (you can find a lot in aws docs and whitepapers). But one thing I should remind, is that, (application) auto scaling is available beyond EC2 (Fargate, Lambda), even beyond compute (RDS, Search …). Also, don’t forget to check our “Tools to observe your cloud expenditure” chapter to find opportunities for right-sizing.
Ease: 3/5: The setups are ingrained into architecture, most of the time.
Effect: 5/5: You’ll definitely be missing a lot if you’re not auto scaling and/or right sizing your resources. So, this is one of the MUST DOs.
🗹 Use (Compute) Savings Plans:
EC2 has the reserved instances option, which can save 30%-40% for one year commitments and 50%-70% for 3 year commitments. It is definitely a huge gain if you know you will need those instances. If you specify also the zones the instances will be created in, those instances will literally be reserved for you (capacity reservations), meaning you’ll most definitely will be assigned that instance whenever you need (as long as you are consuming/using that plan). So, you can utilize/use newer instance types (processor, network ..etc) with zonal plans, which are more (cost-wise) efficient than older ones. If your reserved instance totals cost more than $500 K, you get more and more volume discounts, step-by-step. If you do not need your reserved instances anymore, you can sell them on the marketplace.
Compute Savings Plans are available for all compute resources, including not only EC2, but Fargate and Lambda, as well. Compute Savings Plans do not have capacity reservations, by default (they can be enabled manually), but the (cost) gains are very similar to reserved instances. Compute Saving Plans are also more flexible and customizable than Reserved Instances but cannot be put on marketplace, as of now.
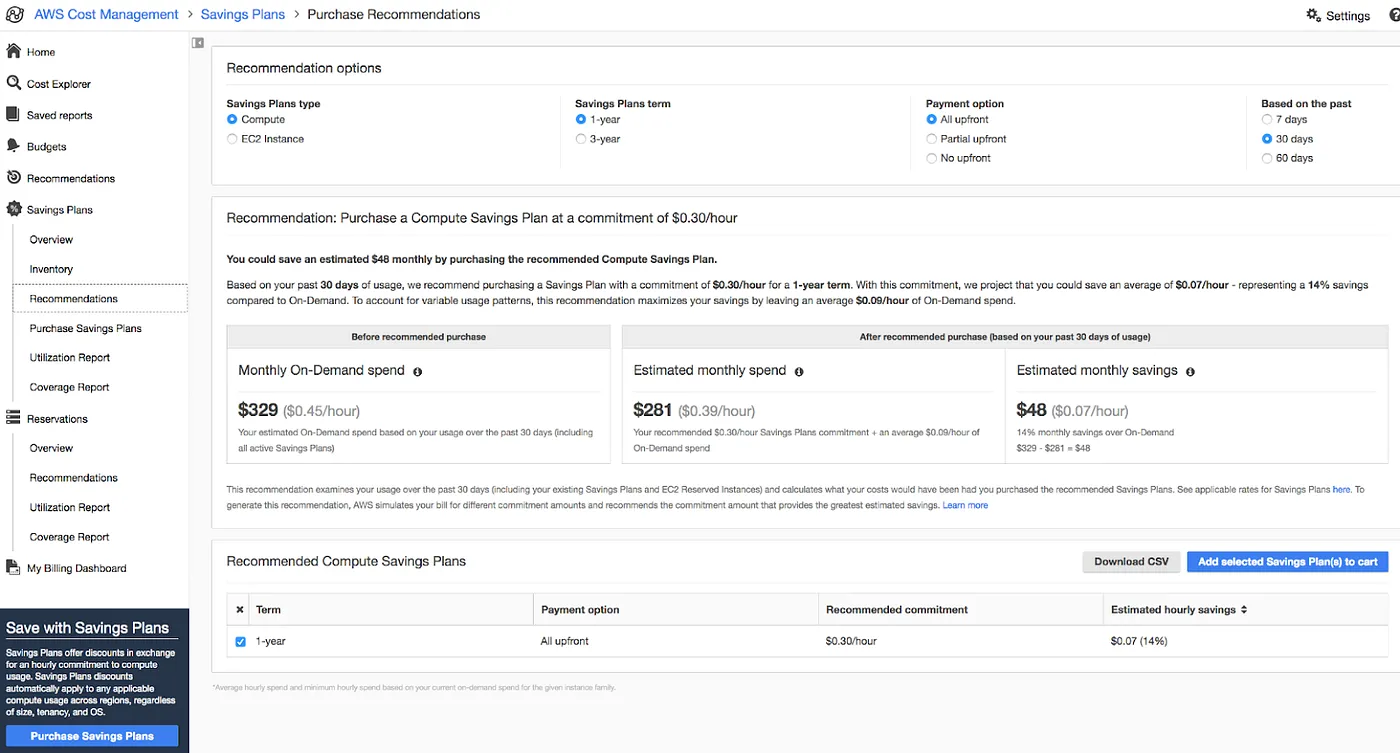
Savings Plan pages have a purchase recommendations page, which you can base your plans:
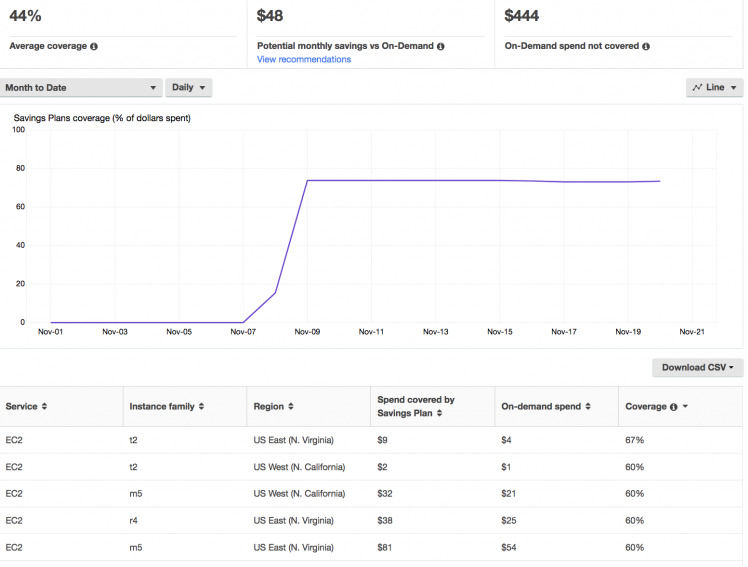
You should monitor your coverage for saving plans (and also reserved instances); coverage shows how many of your (candidate) resources are covered by your plans:
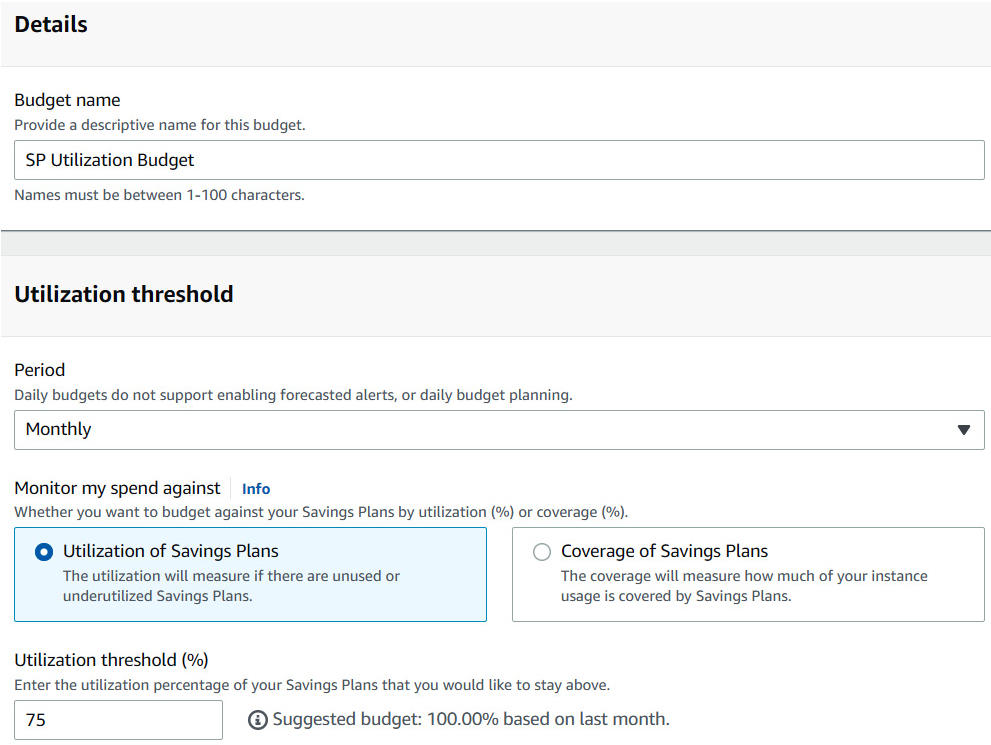
You should also check utilization reports for your savings plans (and also reserved instances); utilization shows the percentage of your reservations you are using:
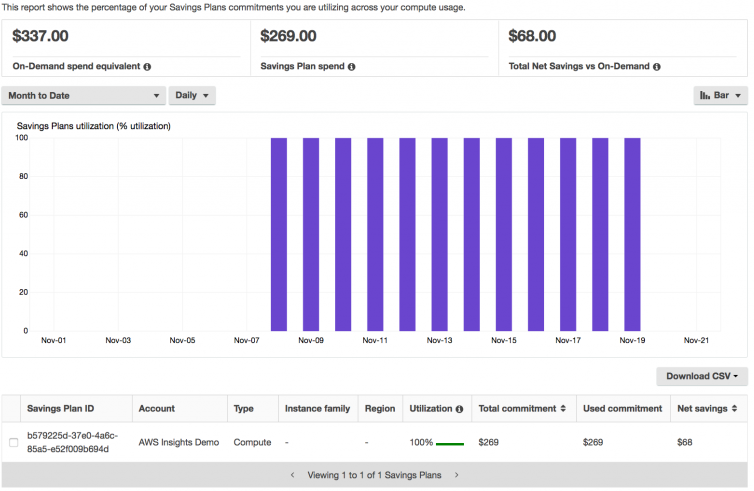
You can also create alarms for coverage and utilization and get notified whenever your usage drops below a predefined value.
Ease: 4/5: It is easy to enable these, but planning effectively requires time and not everyone is ready to plan for commitment.
Effect: 5/5: If planned with care, this is one of the MUST DOs, for long term commitment.
🗹 Use Spot Fleets:
Compute Savings Plan can be a good choice for long term commitments but what about intermittent compute needs (like report generation, data science pipelines, … etc) ? You can use spot instances for these and similar purposes. For fargate it is called fargate spot. You can set a price for the instance type you want, whenever the current spot price drops below your price, you acquire that instance. You can view pricing history for different zones and instance properties:
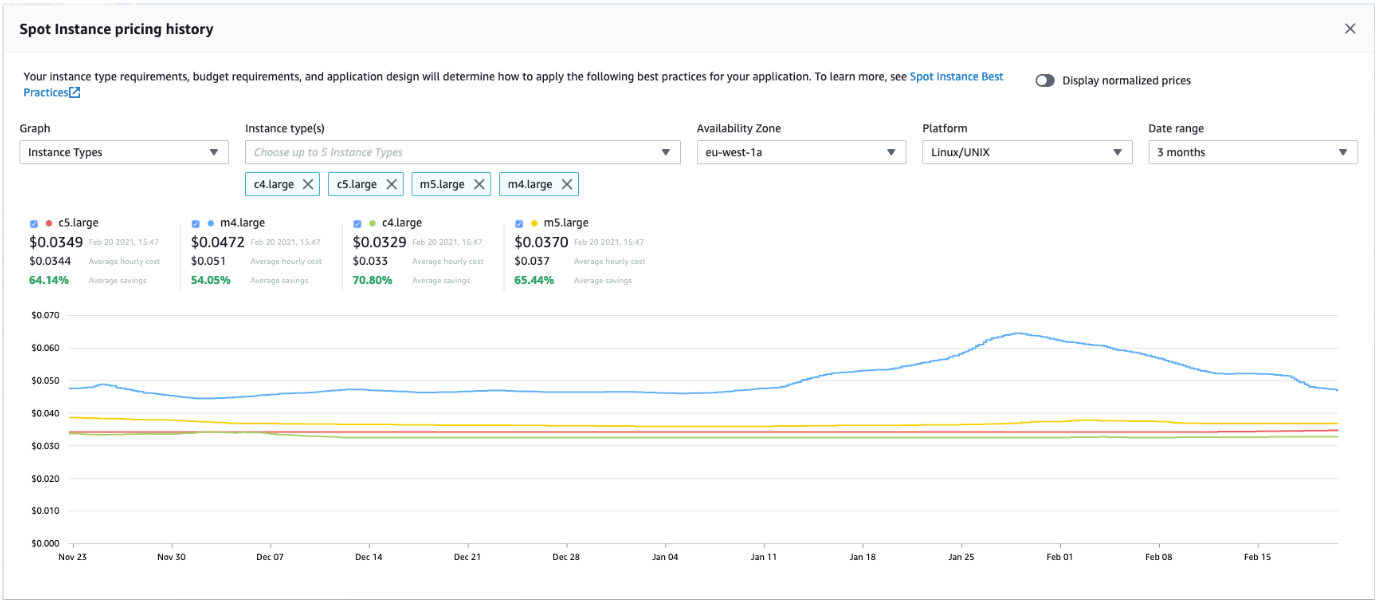
The drawback of spot instances is that, they can be (terminated) and taken away from you whenever AWS needs them. This may seem intimidating, but actually less than 5% of Spot instances are terminated in any given month; so they are (in practice) fairly reliable. You can form machine pools for your daytime workloads, called spot-fleets, combining savings plan (or reserved) instances and spot instances. This way, your always-on instances take your (ceil) idle load and spot instances kick in when there’s spike/increase in load. This actually is becoming the go to architecture even for kubernetes workloads, be it EC2 or Fargate. This way, you get the full cost benefit of long-term commitment and short-term workload provisioning.
Ease: 3/5: It requires a bit of work.
Effect: 5/5: If planned with care, this is also one of the MUST DOs.
Network:
🗹 Use CloudFront:
CloudFront’s main use case is content delivery at the edge. If you have lots of cachable (eg: static, get requests, …etc) content in your services, it will help produce low latency and high performance responses to your users. This caching comes at a price but reduces your compute and network costs, even sometimes by a heavy tradeoff margin.
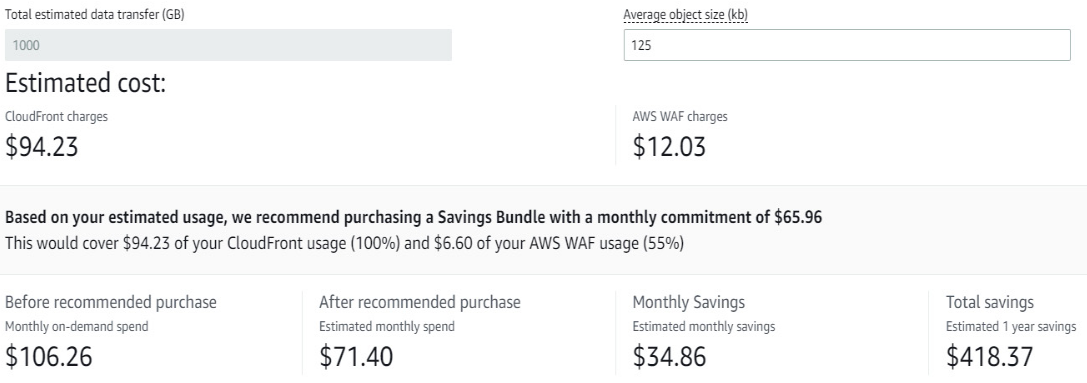
If you’re using AWS WAF with CloudFront (and you’ll mostly be), you can also purchase a Savings Bundle.
Ease: 2/5: It is that not easy to setup and manage.
Effect: 3/5: If planned with care, can result in a fair amount of cost reduction.
🗹 Choose network components wisely:
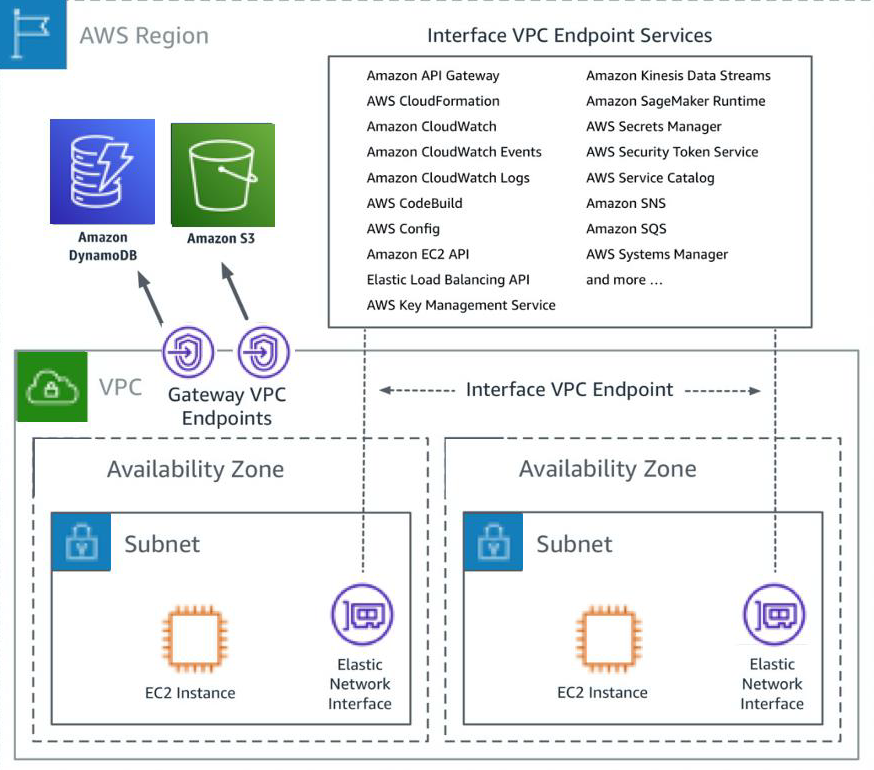
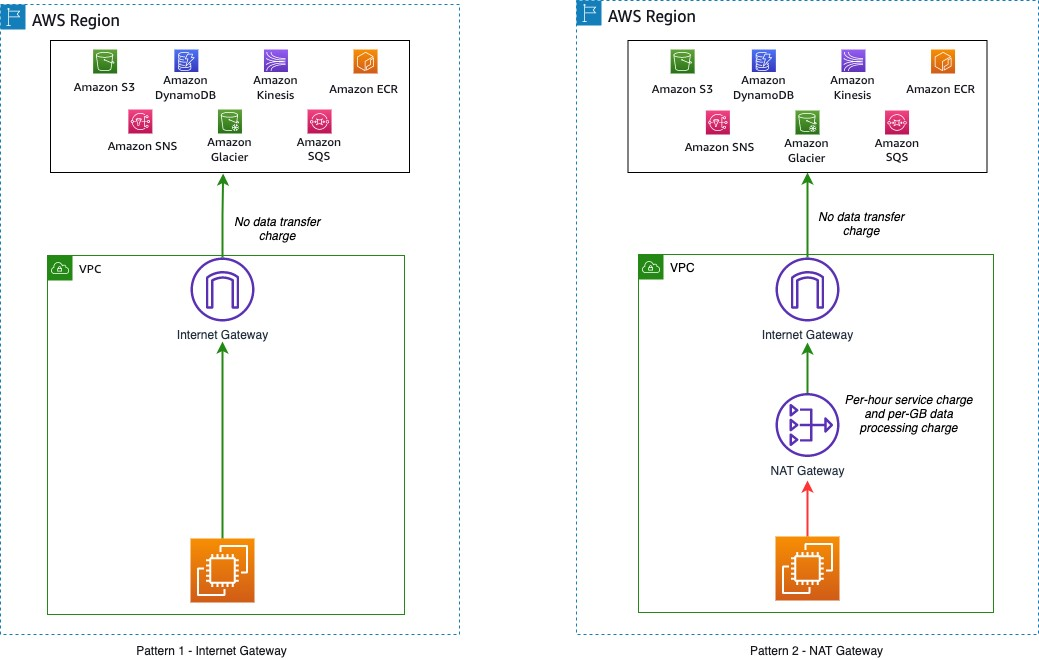
It’s better to check how AWS network costs occur, before making any decisions. Some network interplay may require additional components, like VPN, transit gateway, private-link, …etc. Most of them come with an always-on cost, accumulated in a timely manner, and a pay-as-you-go cost, accumulated whenever network packets pass through. There may be more than one possible (alternative) component for your needs. For example; gateway endpoints (which are only available for S3 and DynamoDB, for now,) are free but interface endpoints have both types of costs.
As another example, internet gateway does not incur any cost (except net-in and out), itself, but NAT Gateway has both types of costs:
Ease: 1/5: It is that not easy to setup, manage and keep track.
Effect: 3/5: If you do not keep track, you may face with a lot of extra network costs.
Summary
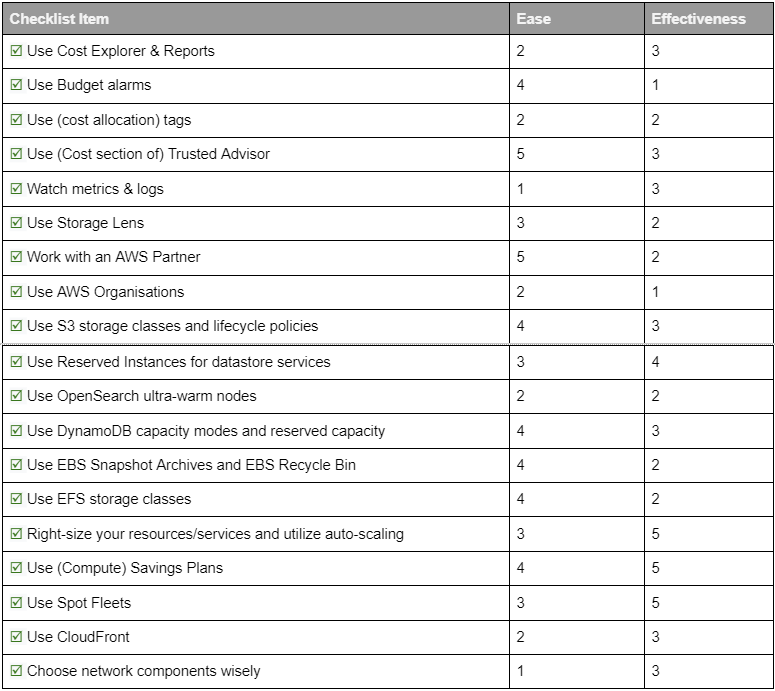
The complete checklist, with ease and effect scores, is summarized in the below table:
References:
- https://learn.finops.org
- AWS FinOps Simplified: Eliminate cloud waste through practical FinOps, by Peter Chung
- https://docs.aws.amazon.com
- https://aws.amazon.com/whitepapers
- Cloud FinOps: Collaborative, Real-Time Cloud Financial Management, by J. R. Storment, Mike Fuller.
Note: This is the last part of a three part series. The first part is here, and the previous part is here.


